Arduino noise levels
Arduino noise levels with LEDs and Processing code

Parts Required:
– Arduino NANO v3.0
– Microphone Sensor
– LED (6)
– Resistor 220 ohm (6)
– Wires to connect it all together

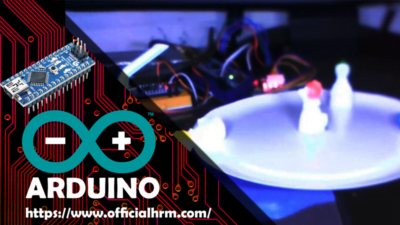
Connect the components and wires as shown in the two pictures.

// Example by Hisham Marzouk
// Officialhrm.com
const int sampleWindow = 50; // Sample window width in mS (50 mS = 20Hz)
int sample;
int led1= 2;
int led2= 3;
int led3= 4;
int led4= 5;
int led5= 6;
int led6= 7;
void setup()
{
Serial.begin(9600);
pinMode(led1, OUTPUT);
pinMode(led2, OUTPUT);
pinMode(led3, OUTPUT);
pinMode(led4, OUTPUT);
pinMode(led5, OUTPUT);
pinMode(led6, OUTPUT);
}
void loop()
{
unsigned long startMillis= millis(); // Start of sample window
unsigned int peakToPeak = 0; // peak-to-peak level
unsigned int signalMax = 0;
unsigned int signalMin = 1024;
// collect data for 50 mS
while (millis() – startMillis < sampleWindow)
{
sample = analogRead(0);
if (sample < 1024) // toss out spurious readings
{
if (sample > signalMax)
{
signalMax = sample; // save just the max levels
}
else if (sample < signalMin)
{
signalMin = sample; // save just the min levels
}
}
}
peakToPeak = signalMax – signalMin; // max – min = peak-peak amplitude
double volts = (peakToPeak * 5.0) / 1024; // convert to volts
Serial.println(volts);
if (volts < 0.03) {
digitalWrite (led1,LOW);
}
else{
digitalWrite (led1,HIGH);
}
if (volts < 0.06) {
digitalWrite (led2,LOW);
}
else{
digitalWrite (led2,HIGH);
}
if (volts < 0.9) {
digitalWrite (led3,LOW);
}
else{
digitalWrite (led3,HIGH);
}
if (volts < 0.12) {
digitalWrite (led4,LOW);
}
else{
digitalWrite (led4,HIGH);
}
if (volts < 0.15) {
digitalWrite (led5,LOW);
}
else{
digitalWrite (led5,HIGH);
}
if (volts < 0.18) {
digitalWrite (led6,LOW);
}
else{
digitalWrite (led6,HIGH);
}
}

Processing Code :

// Example by Hisham Marzouk
//Officialhrm.com
import processing.serial.*;
PImage bg;
Serial myPort; // The serial port
void setup() {
size(100,330);
bg = loadImage(“breadboard2.jpg”);
// List all the available serial ports:
printArray(Serial.list());
// Open the port you are using at the rate you want:
myPort = new Serial(this, Serial.list()[0], 9600);
fill(215, 215, 215);
ellipse(50, 290, 42, 42);
fill(215, 215, 215);
ellipse(50, 240, 42, 42);
fill(215, 215, 215);
ellipse(50, 190, 42, 42);
fill(215, 215, 215);
ellipse(50, 140, 42, 42);
fill(215, 215, 215);
ellipse(50, 90, 42, 42);
fill(215, 215, 215);
ellipse(50, 40, 42, 42);
background(bg);
}
void draw() {
while (myPort.available() > 0) {
String inBuffer = myPort.readString();
if (inBuffer != null) {
println(inBuffer);
}
if(float(inBuffer) > 0.02){
fill(255, 0, 0);
ellipse(50, 290, 42, 42);
}
else {
fill(215, 215, 215);
ellipse(50, 290, 42, 42);
}
if(float(inBuffer) >= 0.04){
fill(0, 255, 0);
ellipse(50, 240, 42, 42);
}
else {
fill(215, 215, 215);
ellipse(50, 240, 42, 42);
}
if(float(inBuffer) >= 0.06){
fill(0, 0, 255);
ellipse(50, 190, 42, 42);
}
else {
fill(215, 215, 215);
ellipse(50, 190, 42, 42);
}
if(float(inBuffer) >= 0.08){
fill(0, 0, 255);
ellipse(50, 140, 42, 42);
}
else {
fill(215, 215, 215);
ellipse(50, 140, 42, 42);
}
if(float(inBuffer) >= 0.10){
fill(255, 255, 255);
ellipse(50, 90, 42, 42);
}
else {
fill(215, 215, 215);
ellipse(50, 90, 42, 42);
}
if(float(inBuffer) >= 0.12){
fill(255, 255, 255);
ellipse(50, 40, 42, 42);
}
else {
fill(215, 215, 215);
ellipse(50, 40, 42, 42);
}
}
}

Download: Analog_Microphne_Leds
For more Please make sure to subscribe to Officialhrm YouTube channel and like Facebook Page.
Thank you for visiting Officialhrm! Please don’t forget to share this website with your friends.
Download
| File | Description | Date added | File size | Downloads |
|---|---|---|---|---|
 Analog_Microphne_Leds
|
August 15, 2018 4:16 pm | 290 KB | 6126 |