How to programming the esp8266 module with FTDI
To program the ESP8266 module with an FTDI, you will need to follow these steps:
- Download and install the Arduino IDE.
- Open the Arduino IDE and go to the “File” menu, then select “Preferences.”
- In the “Additional Boards Manager URLs” field, enter the URL for the ESP8266 board manager: “http://arduino.esp8266.com/stable/package_esp8266com_index.json“
Parts Required:
- ESP8266-01
- FT232RL FT232 USB ZU TTL 5 V 3,3 V
- LEDs(2)
- Wire to connect it all together

Fix error in Arduino IDE:
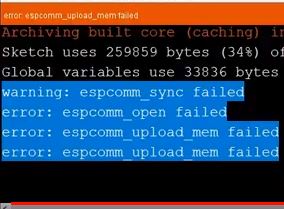
warning:espcomm_sync failed
error: espcomm_open failed
error: espcomm_upload_mem failed
error: espcomm_upload_mem failed
To fix the error put a jumper wire between Ground and Io0 (IO Zero) to put the Esp8266-01 in the Programming mode

ARDUINO IDE CONFIGURATION:
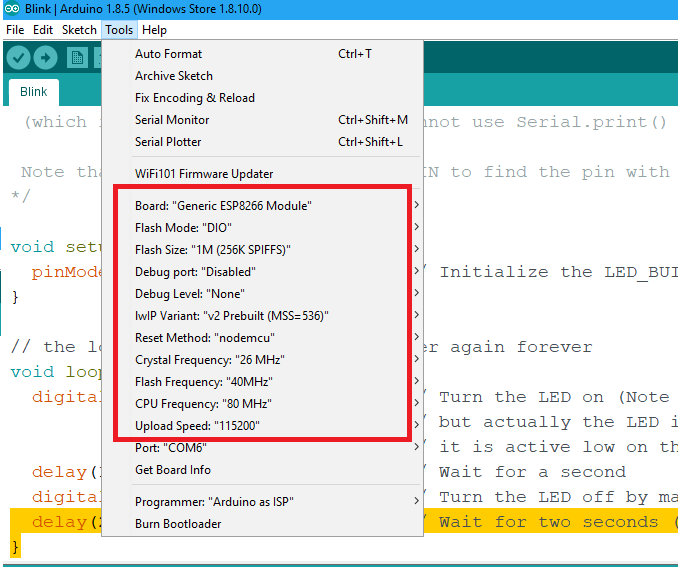
select the port shown on your side, in my case I got Com6.
Arduino test Code:

/*

 * Hisham Marzouk

 * https://www.Officialhrm.com

 * The server will set a GPIO pin depending on the request

 * http://Esp8266_server_ip/gpio/0 will set the Blue LED low,
 * http://Esp8266_server_ip/gpio/1 will set the Blue LED high,

 * http://Esp8266_server_ip/gpio1/2 will set the Green LED low,

 * http://Esp8266_server_ip/gpio1/3 will set the Green LED high,

* server_ip is the IP address of the ESP8266 module, will be

 * printed to Serial when the module is connected.

 */
#include <ESP8266WiFi.h>
const char* ssid = “officialhrm”; // write your SSID
const char* password = “123456789”; // write your Password
// Create an instance of the server
// specify the port to listen on as an argument
WiFiServer server(80);
void setup() {
Serial.begin(115200);
delay(10);
// prepare GPIO2
pinMode(2, OUTPUT);
digitalWrite(2, 0);
// prepare GPIO0
pinMode(0, OUTPUT);
digitalWrite(0, 0);
// Connect to WiFi network
Serial.println();
Serial.println();
Serial.print(“Connecting to “);
Serial.println(ssid);
WiFi.mode(WIFI_STA);
WiFi.begin(ssid, password);
while (WiFi.status() != WL_CONNECTED) {
delay(500);
Serial.print(“.”);
}
Serial.println(“”);
Serial.println(“WiFi connected”);
// Start the server
server.begin();
Serial.println(“Server started”);
// Print the IP address
Serial.println(WiFi.localIP());
}
void loop() {
// Check if a client has connected
WiFiClient client = server.available();
if (!client) {
return;
}
// Wait until the client sends some data
Serial.println(“new client”);
while(!client.available()){
delay(2);
}
// Read the first line of the request
String req = client.readStringUntil(‘\r’);
Serial.println(req);
client.flush();
// Match the request
int val;
int val1;
if (req.indexOf(“/gpio/0”) != –1){
val = 0;
digitalWrite(2, val);}
else if (req.indexOf(“/gpio/1”) != –1){
val = 1;
digitalWrite(2, val);}
else if (req.indexOf(“/gpio1/2”) != –1){
val1 = 0;
digitalWrite(0, val1);}
else if (req.indexOf(“/gpio1/3”) != –1){
val1 = 1;
digitalWrite(0, val1);}
else {
Serial.println(“invalid request”);
client.stop();
return;
}
client.flush();
}

After Uploading:
- Remove the Io0 (IO Zero) from Ground
- In the Arduino IDE Open the Serial Monitor Window by Pressing (Ctrl+Shift+M)
- remove the VCC(3.3V) from the ESP8266 module and reconnect it to get the Server Ip Address
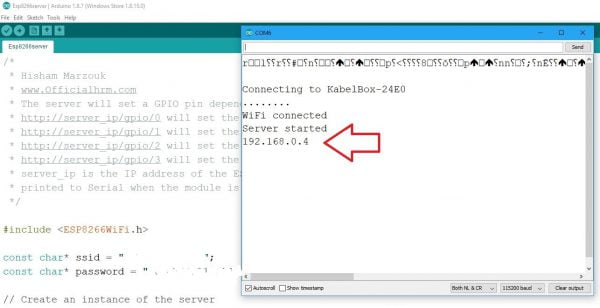
in my case, I got 192.168.0.4 as Esp8266_server_ip
Now connect Io0 and Io2 to LEDs Open this links below in your Explorer (Chrome).
http://Esp8266_server_ip/gpio/0 will set the IO0 low,
http://Esp8266_server_ip/gpio/1 will set the IO0 high,

http://Esp8266_server_ip/gpio1/2 will set the IO2 low,

http://Esp8266_server_ip/gpio1/3 will set the IO2 high,
Download:Esp8266-01
Thank you for visiting. If you found this information helpful, please consider subscribing to the Officialhrm YouTube channel and liking their Facebook Page for more updates and helpful content. Don’t forget to share this website with your friends.
Download
| File | Description | Date added | File size | Downloads |
|---|---|---|---|---|
 Esp8266-01
|
October 20, 2018 6:54 pm | 1 MB | 13915 |
I am getting an error at the beginning where the ssid and password are declared. I have not done much C coding so I am stuck! The error is:
D:\Downloads\ESP8266_Control_Relay\ESP8266_Control_Relay.ino: In function ‘void setup()’:
ESP8266_Control_Relay:26:22: error: call of overloaded ‘println(const char* [10])’ is ambiguous
Serial.println(ssid);
^
D:\Downloads\ESP8266_Control_Relay\ESP8266_Control_Relay.ino:26:22: note: candidates are:
In file included from C:\Users\tehud\AppData\Local\Arduino15\packages\esp8266\hardware\esp8266\2.5.2\cores\esp8266/Stream.h:26:0,
from C:\Users\tehud\AppData\Local\Arduino15\packages\esp8266\hardware\esp8266\2.5.2\cores\esp8266/HardwareSerial.h:32,
from C:\Users\tehud\AppData\Local\Arduino15\packages\esp8266\hardware\esp8266\2.5.2\cores\esp8266/Arduino.h:263,
from C:\Users\tehud\AppData\Local\Temp\arduino_build_709018\sketch\ESP8266_Control_Relay.ino.cpp:1:
C:\Users\tehud\AppData\Local\Arduino15\packages\esp8266\hardware\esp8266\2.5.2\cores\esp8266/Print.h:93:16: note: size_t Print::println(char)
size_t println(char);
^
C:\Users\tehud\AppData\Local\Arduino15\packages\esp8266\hardware\esp8266\2.5.2\cores\esp8266/Print.h:93:16: note: no known conversion for argument 1 from ‘const char* [10]’ to ‘char’
C:\Users\tehud\AppData\Local\Arduino15\packages\esp8266\hardware\esp8266\2.5.2\cores\esp8266/Print.h:94:16: note: size_t Print::println(unsigned char, int)
size_t println(unsigned char, int = DEC);
^
C:\Users\tehud\AppData\Local\Arduino15\packages\esp8266\hardware\esp8266\2.5.2\cores\esp8266/Print.h:94:16: note: no known conversion for argument 1 from ‘const char* [10]’ to ‘unsigned char’
C:\Users\tehud\AppData\Local\Arduino15\packages\esp8266\hardware\esp8266\2.5.2\cores\esp8266/Print.h:95:16: note: size_t Print::println(int, int)
size_t println(int, int = DEC);
^
C:\Users\tehud\AppData\Local\Arduino15\packages\esp8266\hardware\esp8266\2.5.2\cores\esp8266/Print.h:95:16: note: no known conversion for argument 1 from ‘const char* [10]’ to ‘int’
C:\Users\tehud\AppData\Local\Arduino15\packages\esp8266\hardware\esp8266\2.5.2\cores\esp8266/Print.h:96:16: note: size_t Print::println(unsigned int, int)
size_t println(unsigned int, int = DEC);
^
C:\Users\tehud\AppData\Local\Arduino15\packages\esp8266\hardware\esp8266\2.5.2\cores\esp8266/Print.h:96:16: note: no known conversion for argument 1 from ‘const char* [10]’ to ‘unsigned int’
C:\Users\tehud\AppData\Local\Arduino15\packages\esp8266\hardware\esp8266\2.5.2\cores\esp8266/Print.h:97:16: note: size_t Print::println(long int, int)
size_t println(long, int = DEC);
^
C:\Users\tehud\AppData\Local\Arduino15\packages\esp8266\hardware\esp8266\2.5.2\cores\esp8266/Print.h:97:16: note: no known conversion for argument 1 from ‘const char* [10]’ to ‘long int’
C:\Users\tehud\AppData\Local\Arduino15\packages\esp8266\hardware\esp8266\2.5.2\cores\esp8266/Print.h:98:16: note: size_t Print::println(long unsigned int, int)
size_t println(unsigned long, int = DEC);
^
C:\Users\tehud\AppData\Local\Arduino15\packages\esp8266\hardware\esp8266\2.5.2\cores\esp8266/Print.h:98:16: note: no known conversion for argument 1 from ‘const char* [10]’ to ‘long unsigned int’
ESP8266_Control_Relay:28:28: error: no matching function for call to ‘WiFiClass::begin(const char* [10], const char*&)’
WiFi.begin(ssid, password);
^
D:\Downloads\ESP8266_Control_Relay\ESP8266_Control_Relay.ino:28:28: note: candidates are:
In file included from D:\Downloads\ESP8266_Control_Relay\ESP8266_Control_Relay.ino:3:0:
C:\Program Files (x86)\Arduino\libraries\WiFi\src/WiFi.h:60:9: note: int WiFiClass::begin(char*)
int begin(char* ssid);
^
C:\Program Files (x86)\Arduino\libraries\WiFi\src/WiFi.h:60:9: note: candidate expects 1 argument, 2 provided
C:\Program Files (x86)\Arduino\libraries\WiFi\src/WiFi.h:70:9: note: int WiFiClass::begin(char*, uint8_t, const char*)
int begin(char* ssid, uint8_t key_idx, const char* key);
^
C:\Program Files (x86)\Arduino\libraries\WiFi\src/WiFi.h:70:9: note: candidate expects 3 arguments, 2 provided
C:\Program Files (x86)\Arduino\libraries\WiFi\src/WiFi.h:79:9: note: int WiFiClass::begin(char*, const char*)
int begin(char* ssid, const char *passphrase);
I am having problems programming the ESP-01 using your instructions. Can you tell me what version of the Generic ESP8266 board you had installed when you did this article. I don’t know if this would cause the problem I am having, as it says that the serial port dose not exist or the board is not connected.
I have checked the connections and they are correct. What do the LED’s on the esp01 indicate?
Hope you can help?